Table of Contents
Basics of Home Canning: A Beginner’s Guide

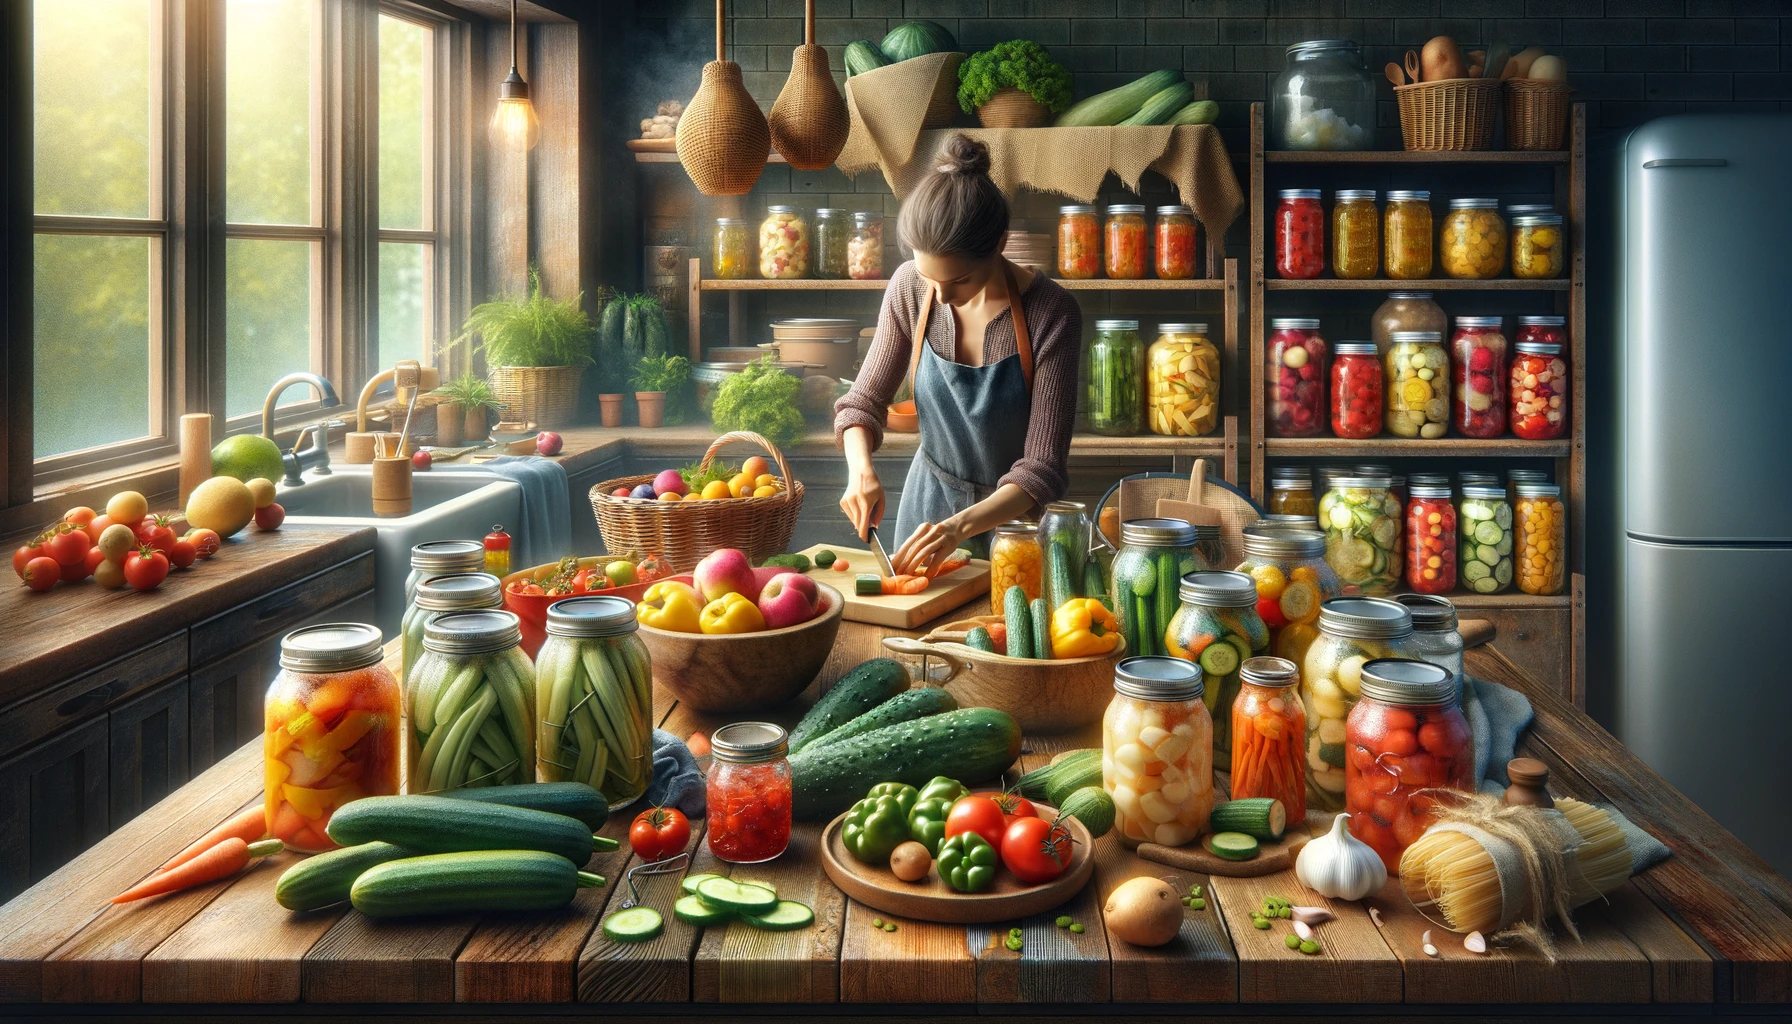
Getting Started with Home Canning
Canning is a fantastic way to preserve your favorite fruits and vegetables for long-term storage.
To begin home canning, you’ll need essential equipment like a canning jar, lid, and a pressure canner for certain foods.
| Equipment | Average Cost | Recommended Brands |
|---|---|---|
| Canning Jars | $0.80 – $1.50 per jar | Ball, Kerr, Mason |
| Canning Lids | $0.10 – $0.25 per lid | Ball, Kerr, Tattler |
| Canning Bands | $0.10 – $0.25 per band | Ball, Kerr |
| Pressure Canner | $70 – $200 | Presto, All American |
| Water Bath Canner | $20 – $50 | Granite Ware, Ball |
| Jar Lifter | $5 – $15 | Norpro, Ball, OXO |
| Canning Funnel | $5 – $10 | Norpro, Ball, RSVP |
| Bubble Remover | $3 – $8 | Ball, Norpro, OXO |
| Magnetic Lid Lifter | $5 – $10 | Ball, Norpro, OXO |
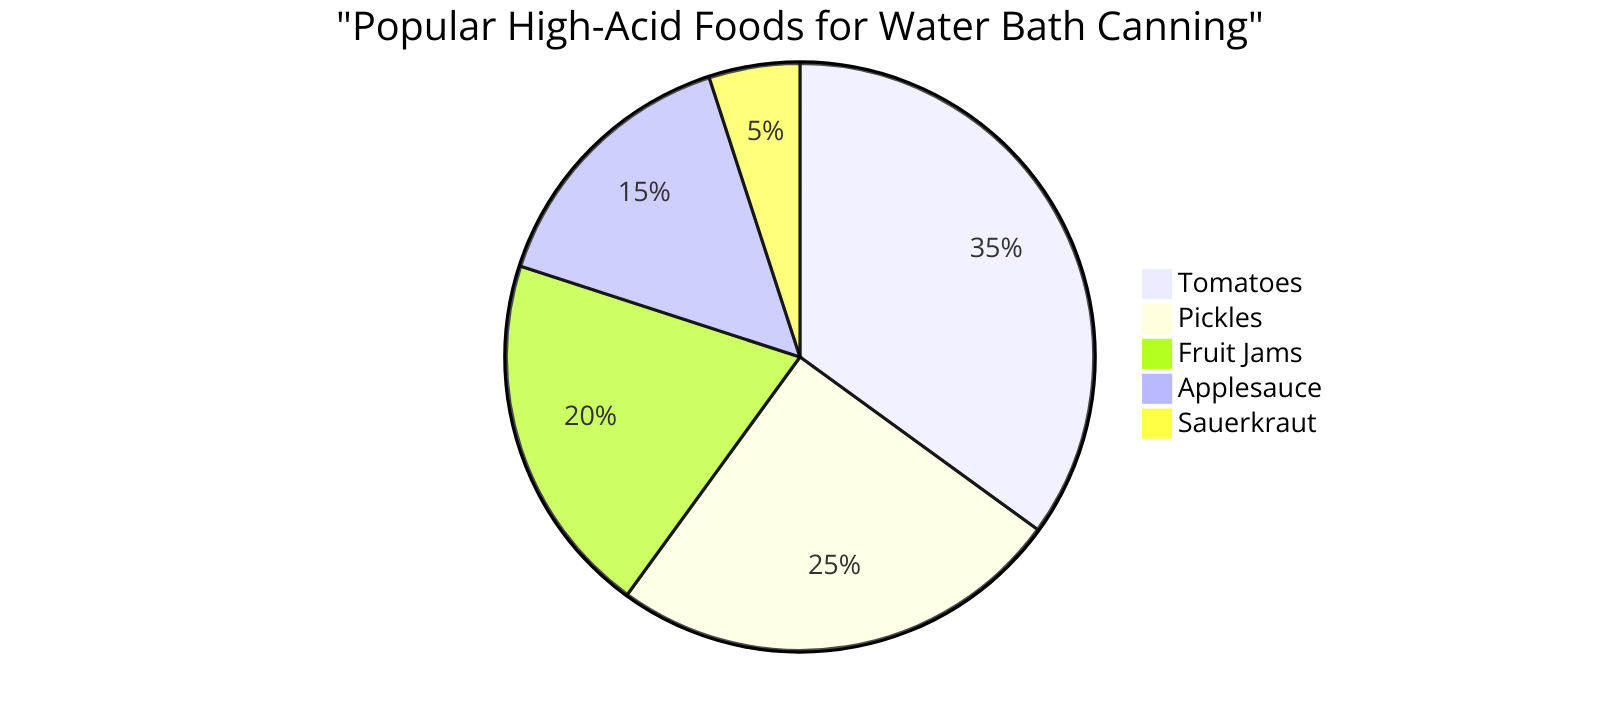
Make sure to pick up some high-acid food like tomatoes or citrus fruits for your first attempts at water bath canning.
The Canning Process Simplified
When diving into home canning, it’s crucial to follow a few simple steps for successful food preservation.
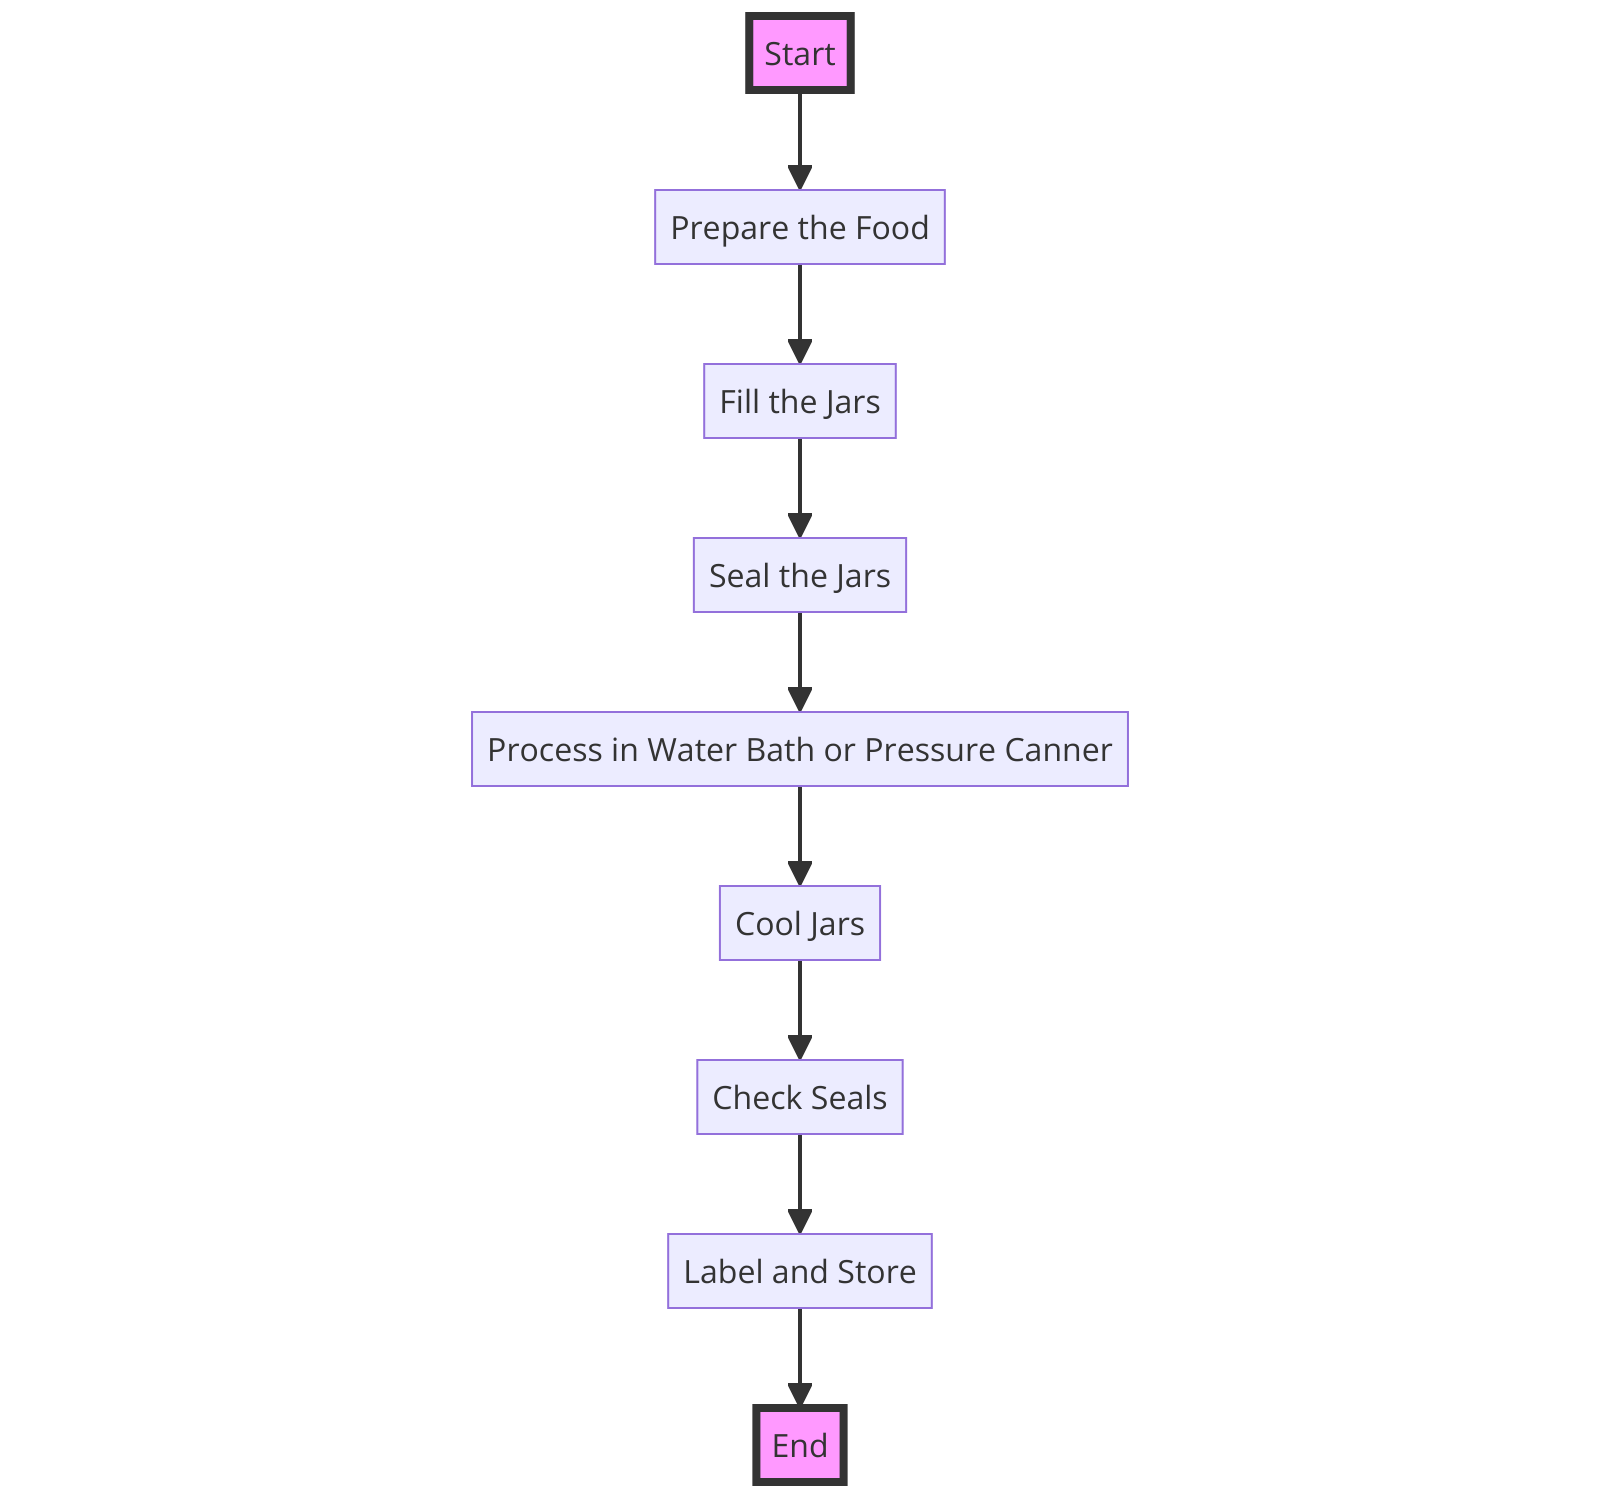
Start by preparing your food by washing and cutting it to size.
Next, fill your canning jar with the food and the recommended preservation liquid, whether it’s pickle brine or boiling water depending on the chosen canning method.
Remember, if you’re exploring pressure canning, always ensure to use the appropriate pressure canner for safety.
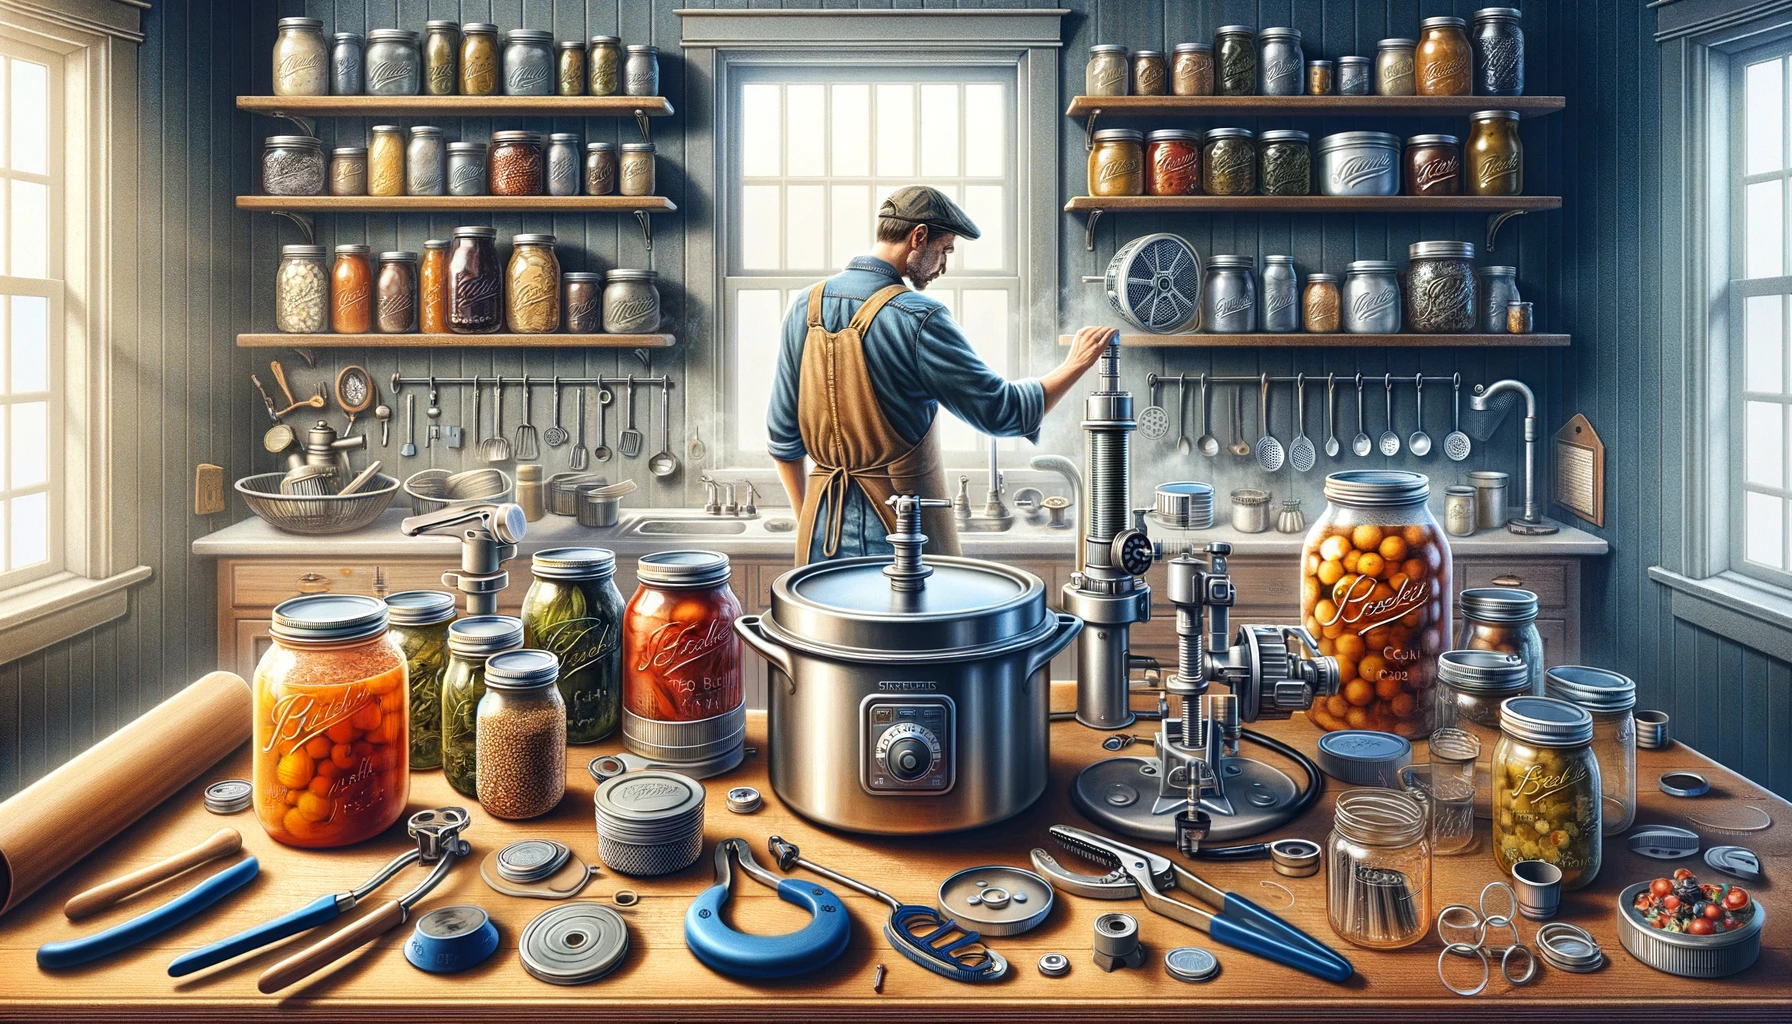
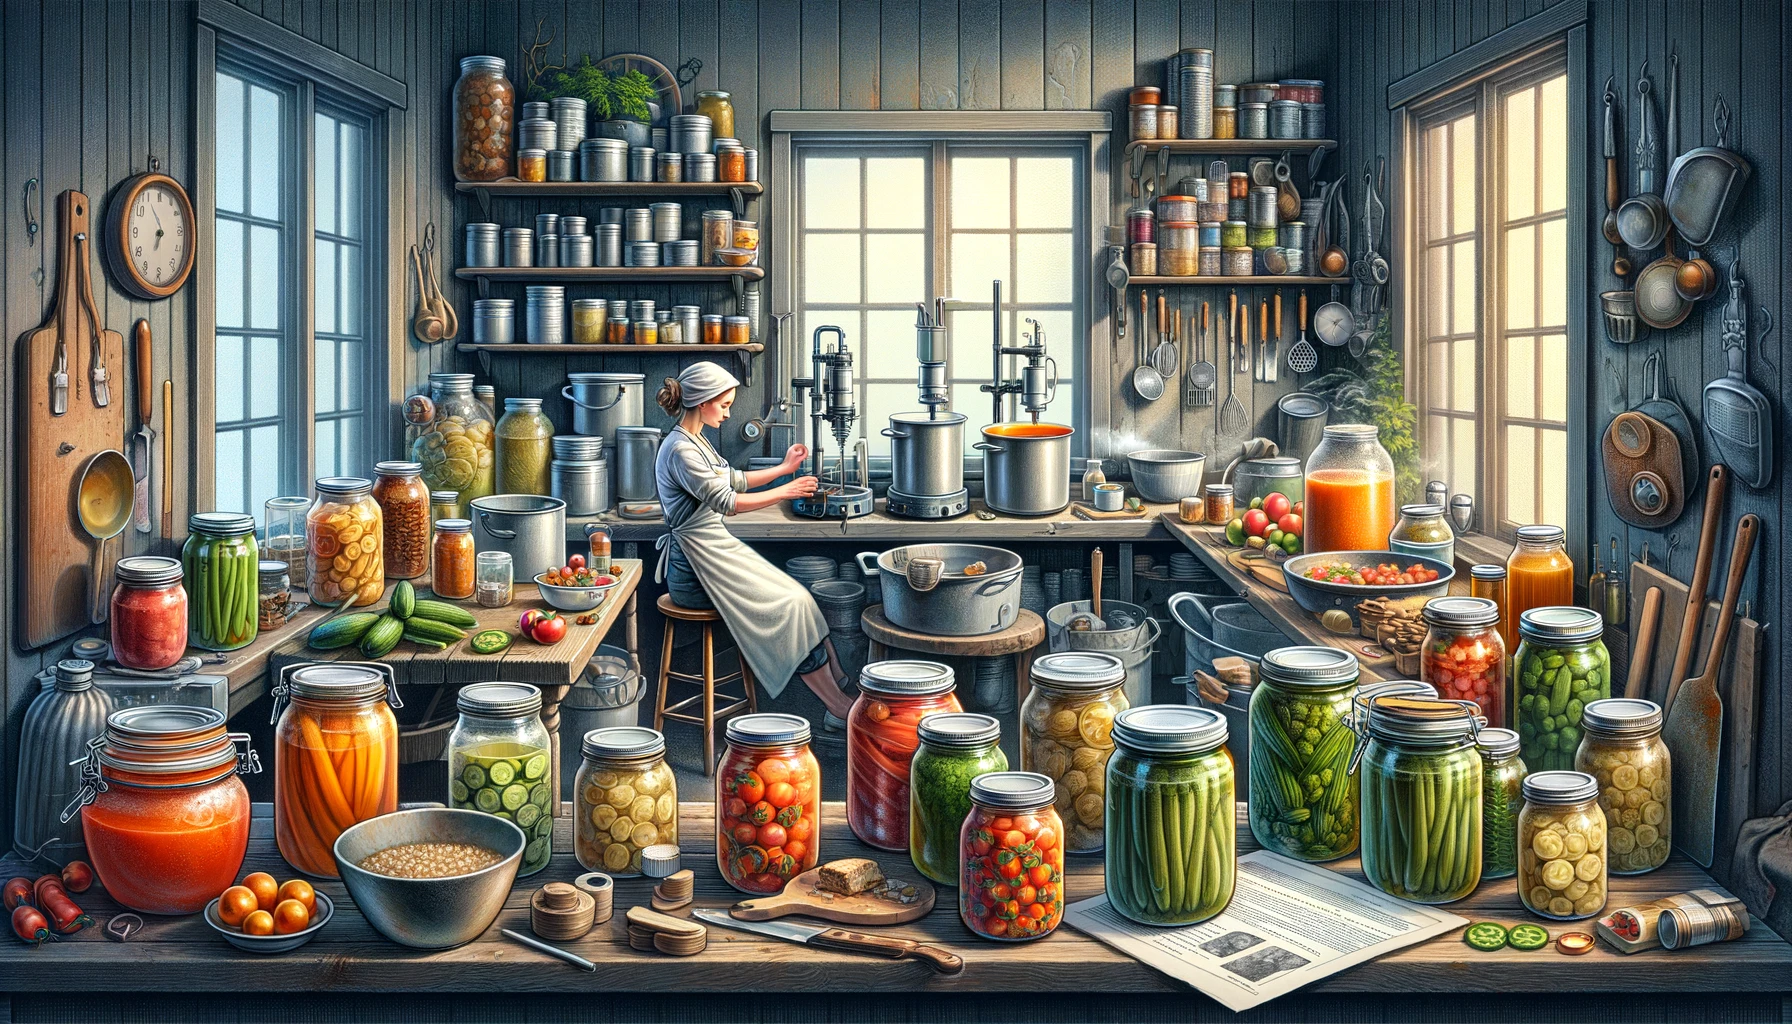
Essential Canning Equipment: From Jars to Pressure Canners
Choosing the Right Jars and Canners
When it comes to home food preservation, having the right equipment is crucial for success.
For water bath canning, Mason jars are a staple, known for their durability and ability to withstand the canning process.
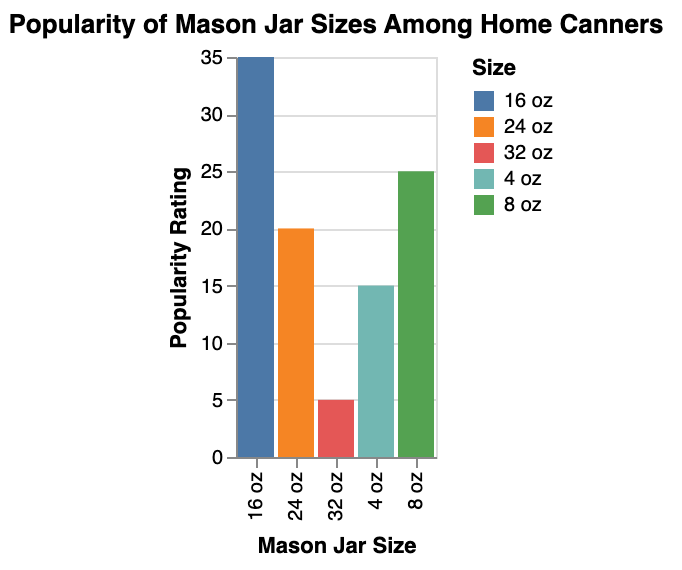
These jars are perfect for filling with your favorite fruits and vegetables to be preserved.
For those looking to preserve low-acid foods or dive into more advanced canning recipes, a pressure canner is essential.
Steps to Canning Success
I always start by gathering all my fruits and vegetables before kickstarting the canning process.
| Type of Canned Goods | Recommended Headspace |
|---|---|
| Jams and Jellies | 1/4 inch (6 mm) |
| Fruits (in syrup) | 1/2 inch (12 mm) |
| Pickles | 1/2 inch (12 mm) |
| Tomatoes | 1/2 inch (12 mm) |
| Vegetables (packed in water) | 1/2 inch (12 mm) |
| Meat, Poultry, and Fish | 1 inch (25 mm) |
| Soups and Stews | 1 inch (25 mm) |
| Salsa | 1/2 inch (12 mm) |
| Fruit Juices | 1/4 inch (6 mm) |
| Fruit Syrups | 1/2 inch (12 mm) |
| Pie Fillings | 1/2 inch (12 mm) |
Thoroughly wash your produce before getting started.
Next, ensure your Mason jars are clean and sterilized to maintain food safety standards throughout the canning process.
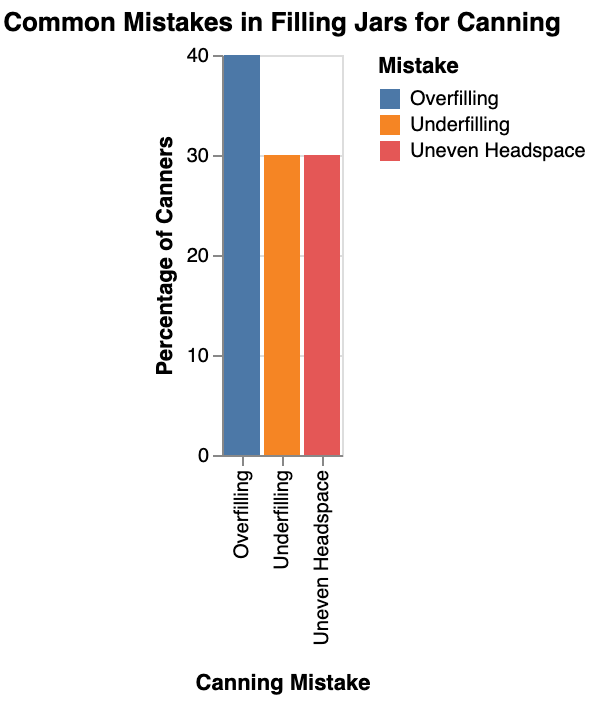
When it’s time to fill the jars, be sure to leave the recommended headspace according to the National Center for Home Food Preservation guidelines.
Water Bath Canning vs. Pressure Canning: Understanding the Difference
Water Bath Canning
When it comes to canning food at home, water bath canning is a popular method for preserving high-acid foods like jams, jellies, and pickles.
By using glass jars and new lids, this method of food preservation ensures that your fresh food remains safe to eat for an extended period.
After filling the jars with the desired items and sealing them with a canning lid, the next step involves submerging the jars in boiling water for the required time based on the type of food being canned.
| High-Acid Foods | Recommended Processing Time (minutes) |
|---|---|
| Tomatoes | 35-45 |
| Pickles | 10-15 |
| Fruit Jams | 5-15 |
| Fruit Juices | 5-10 |
| Fruit Syrups | 5-10 |
| Salsa | 15-20 |
| Pie Fillings | 25-35 |
| Fruit Preserves | 5-15 |
Once the process is complete, it’s crucial to remove the jars carefully and let the jars cool for 12 to 24 hours before storing them.
Pressure Canning Method
In contrast to water bath canning, the pressure canning method is essential for preserving low-acid foods such as vegetables, meats, and fish.
This method is necessary to ensure the safety of your home canned food as the food may contain harmful bacteria if not processed correctly.
By using a pressure canner, which operates at a higher temperature than boiling water, you can effectively eliminate any potential risks.
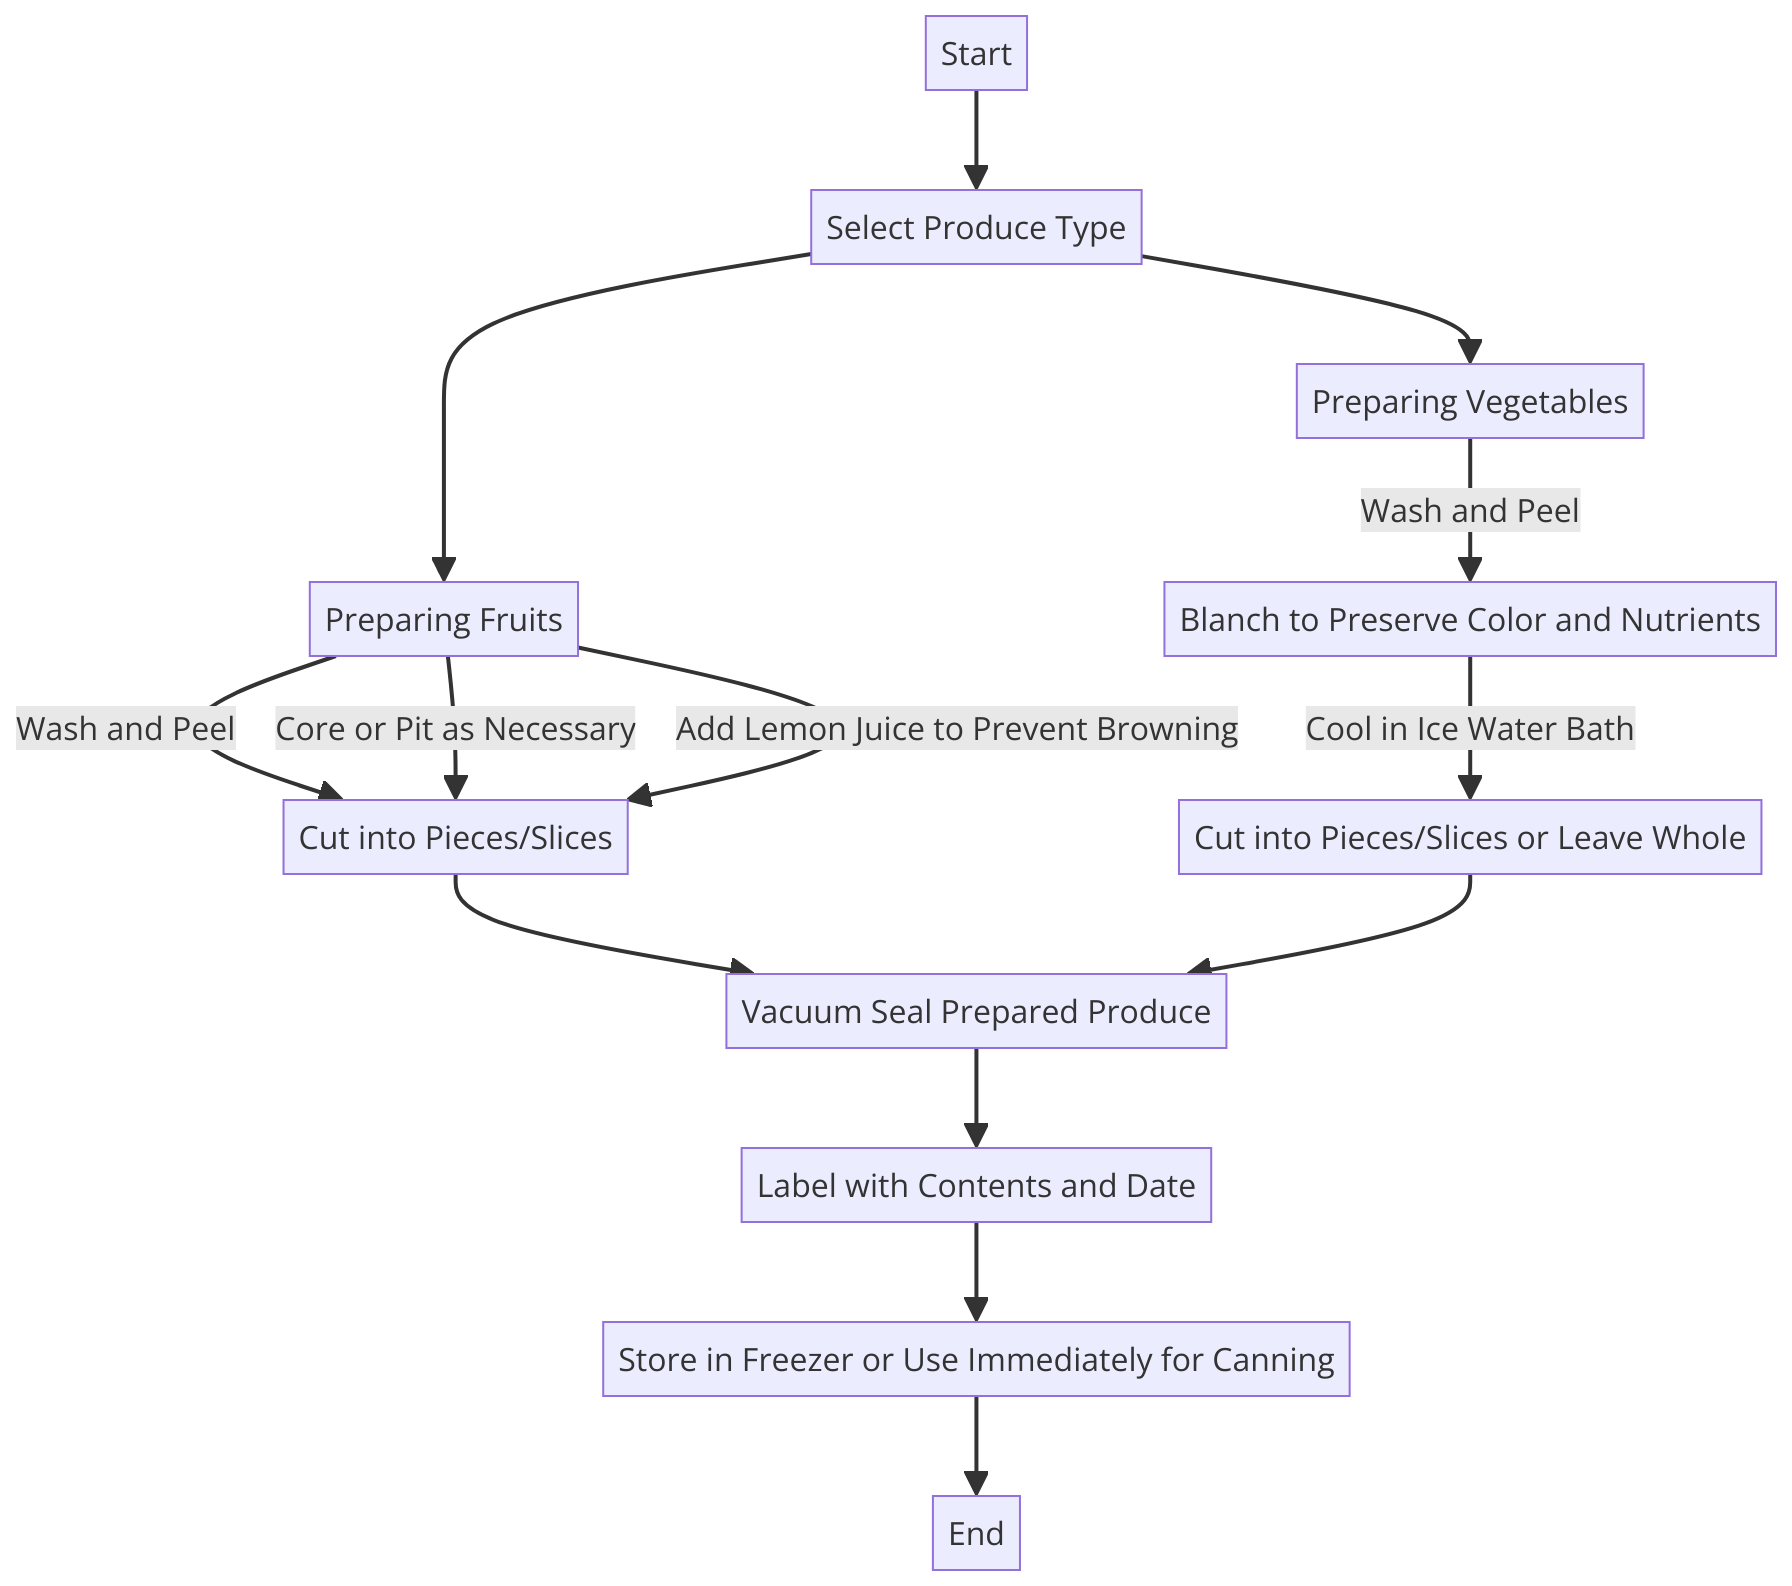
Preparing Your Food for Canning: Tips for Fruits and Vegetables
Prepping Your Produce
When canning fruits and vegetables, ensure they are fresh and at their peak ripeness.
This step is crucial as using overripe or underripe produce can lead to food spoilage.
For instance, if green beans are too mature, they may lack the necessary acidity to be safely canned.
A good practice is to wash the fruits and veggies thoroughly before getting started.
| Produce | Selecting Ripe | Washing & Peeling | Pre-Canning Treatments |
|---|---|---|---|
| Apples | Firm, unblemished | Wash thoroughly | Dip in lemon-water solution |
| Peaches | Fragrant, slightly soft | Rinse gently | Dip in ascorbic acid solution |
| Tomatoes | Ripe, vibrant color | Rinse, remove stems | Blanch, peel, and core |
| Green Beans | Firm, crisp | Rinse, remove ends | Blanch before canning |
| Carrots | Firm, vibrant color | Scrub, peel if desired | Blanch, slice or leave whole |
| Strawberries | Bright, firm | Rinse gently, remove hulls | Rinse in cold water, drain |
| Bell Peppers | Firm, shiny skin | Rinse, remove seeds | Roast, peel, and slice |
| Cucumbers | Firm, dark green | Rinse, scrub gently | Soak in brine solution |
Filling the Jars
- Fill hot jars with prepared food, leaving the appropriate headspace at the top of the jar as per your recipe.
- Boil the jar lids to sterilize them and prevent any contamination.
- Place the filled jars inside the canning pot filled with water to start the process. Make sure the water level covers the jars by at least an inch to ensure even preservation.
- Bring the water with the food in jars to boiling point to kill any bacteria and pathogens present.
- Once done, use caution as the jars will be hot. Let them cool before testing the sealed jars by pressing the center of the lid for any give.
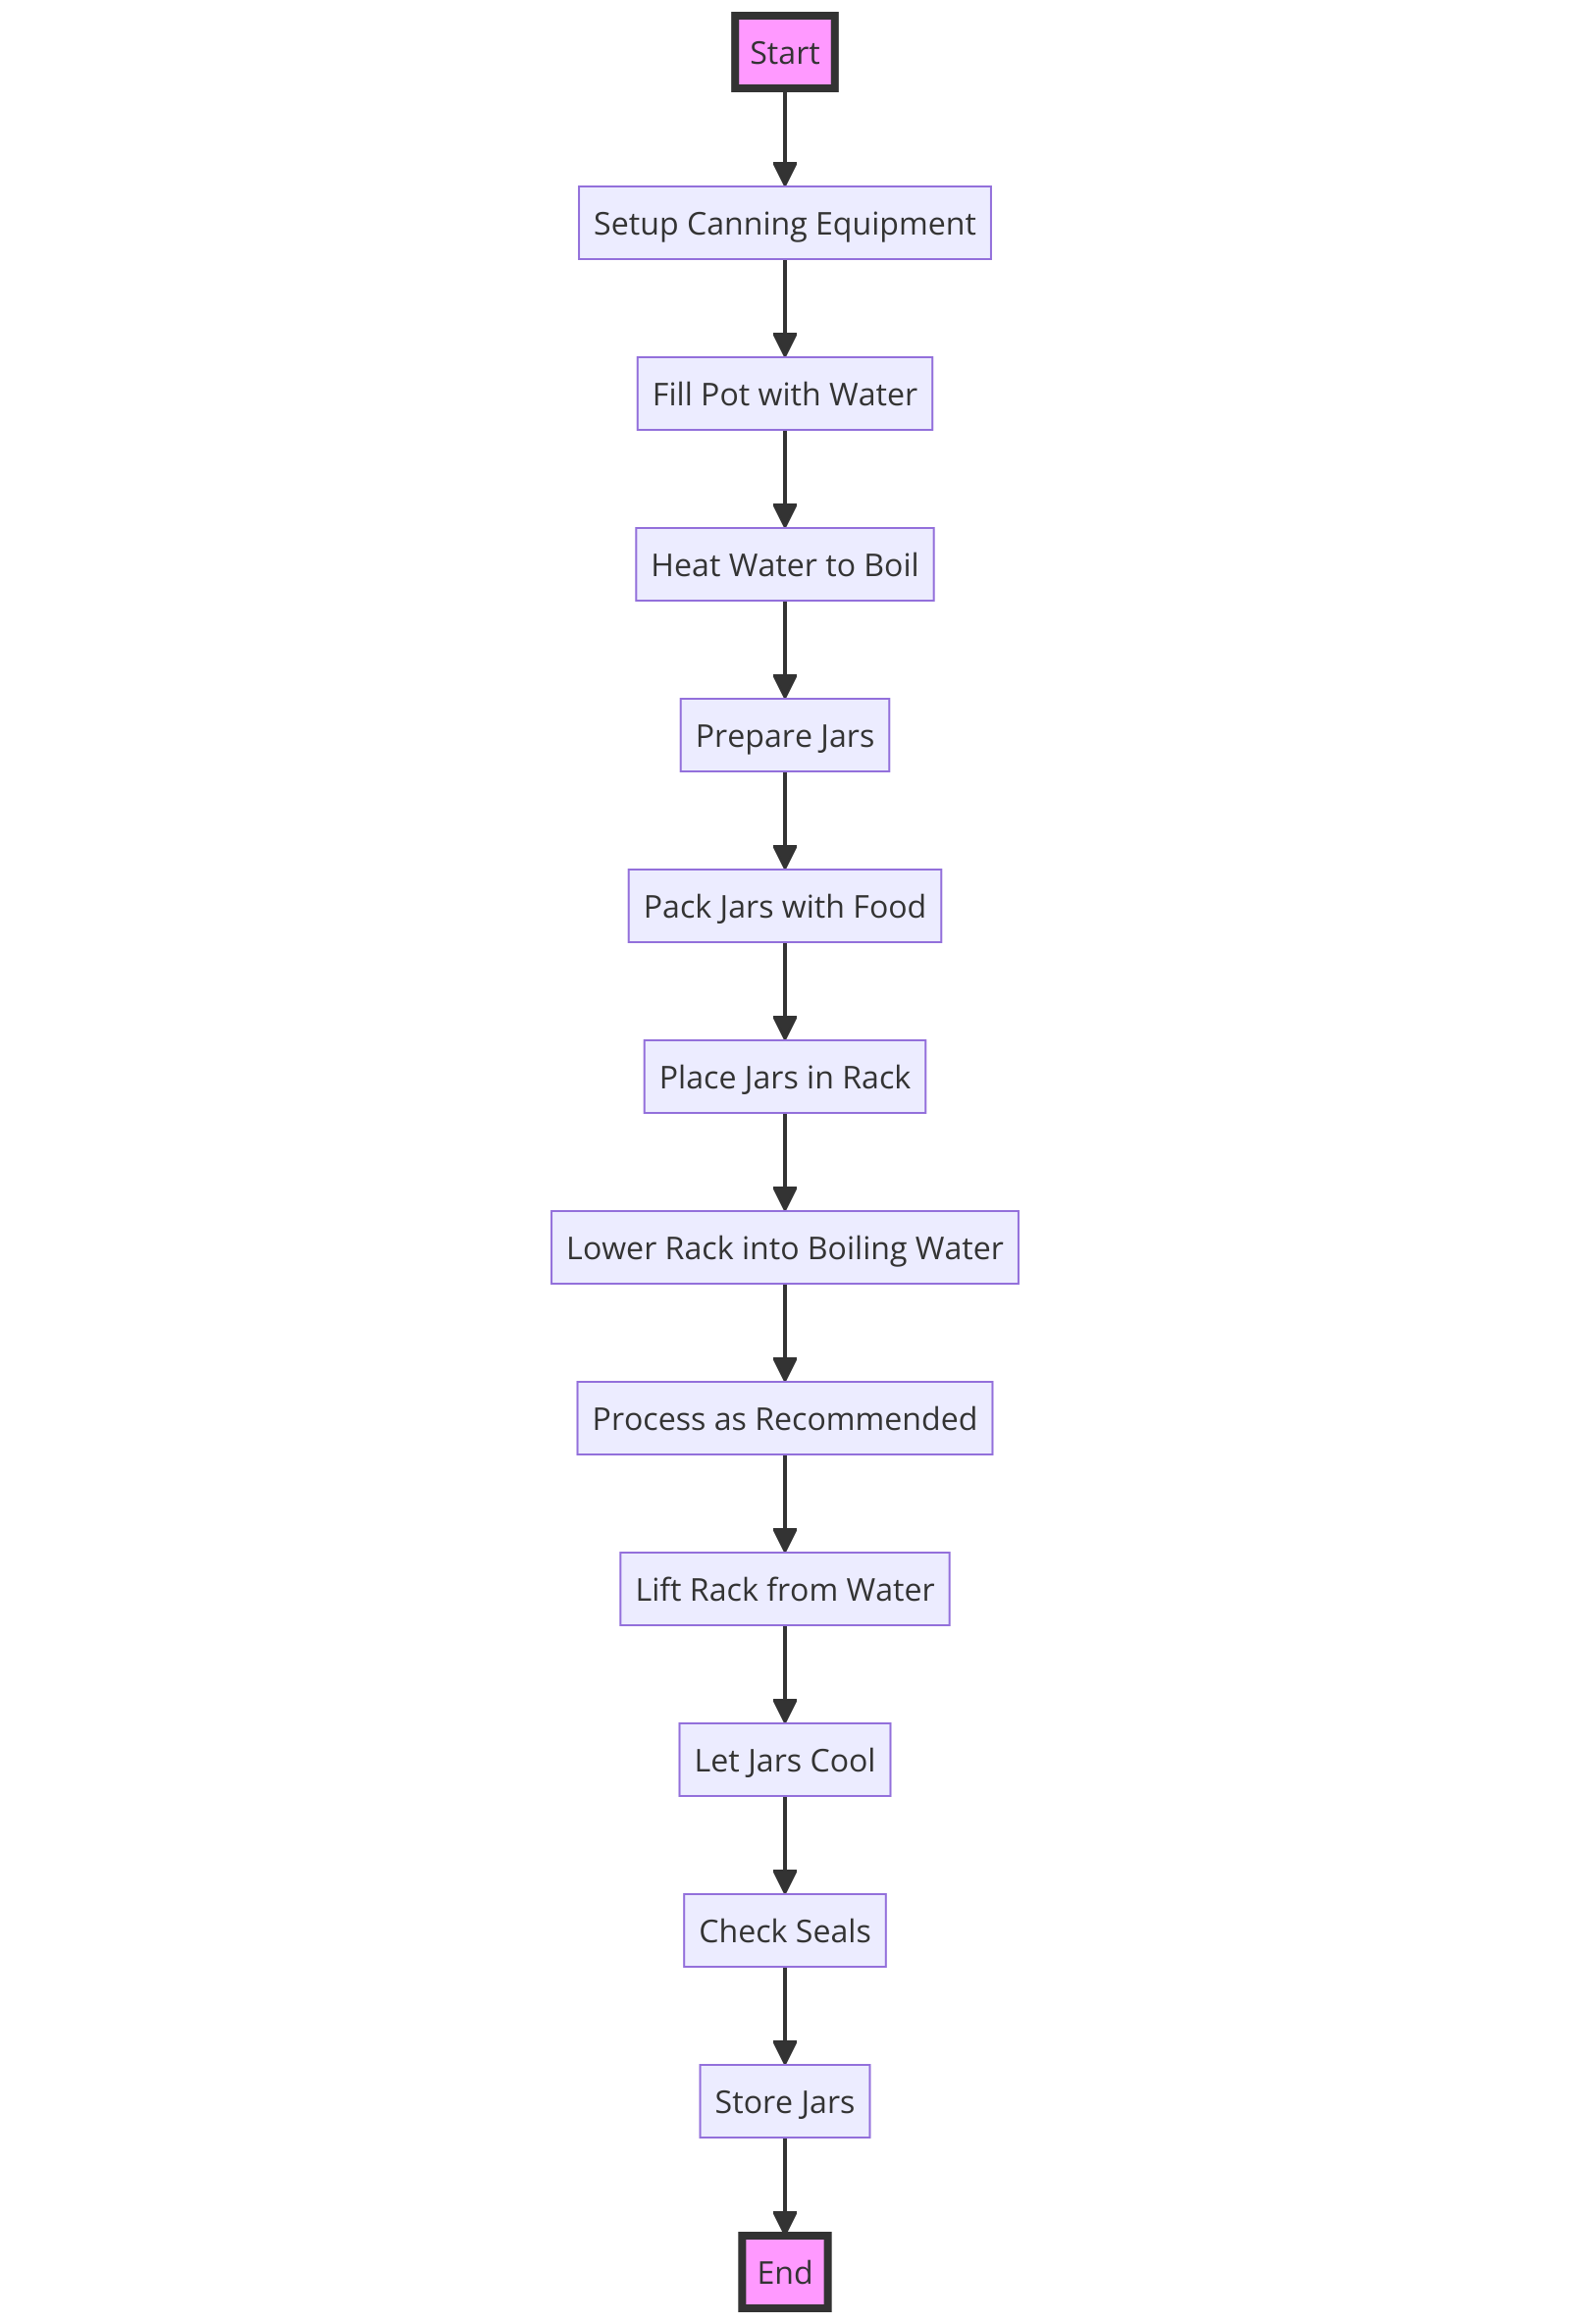
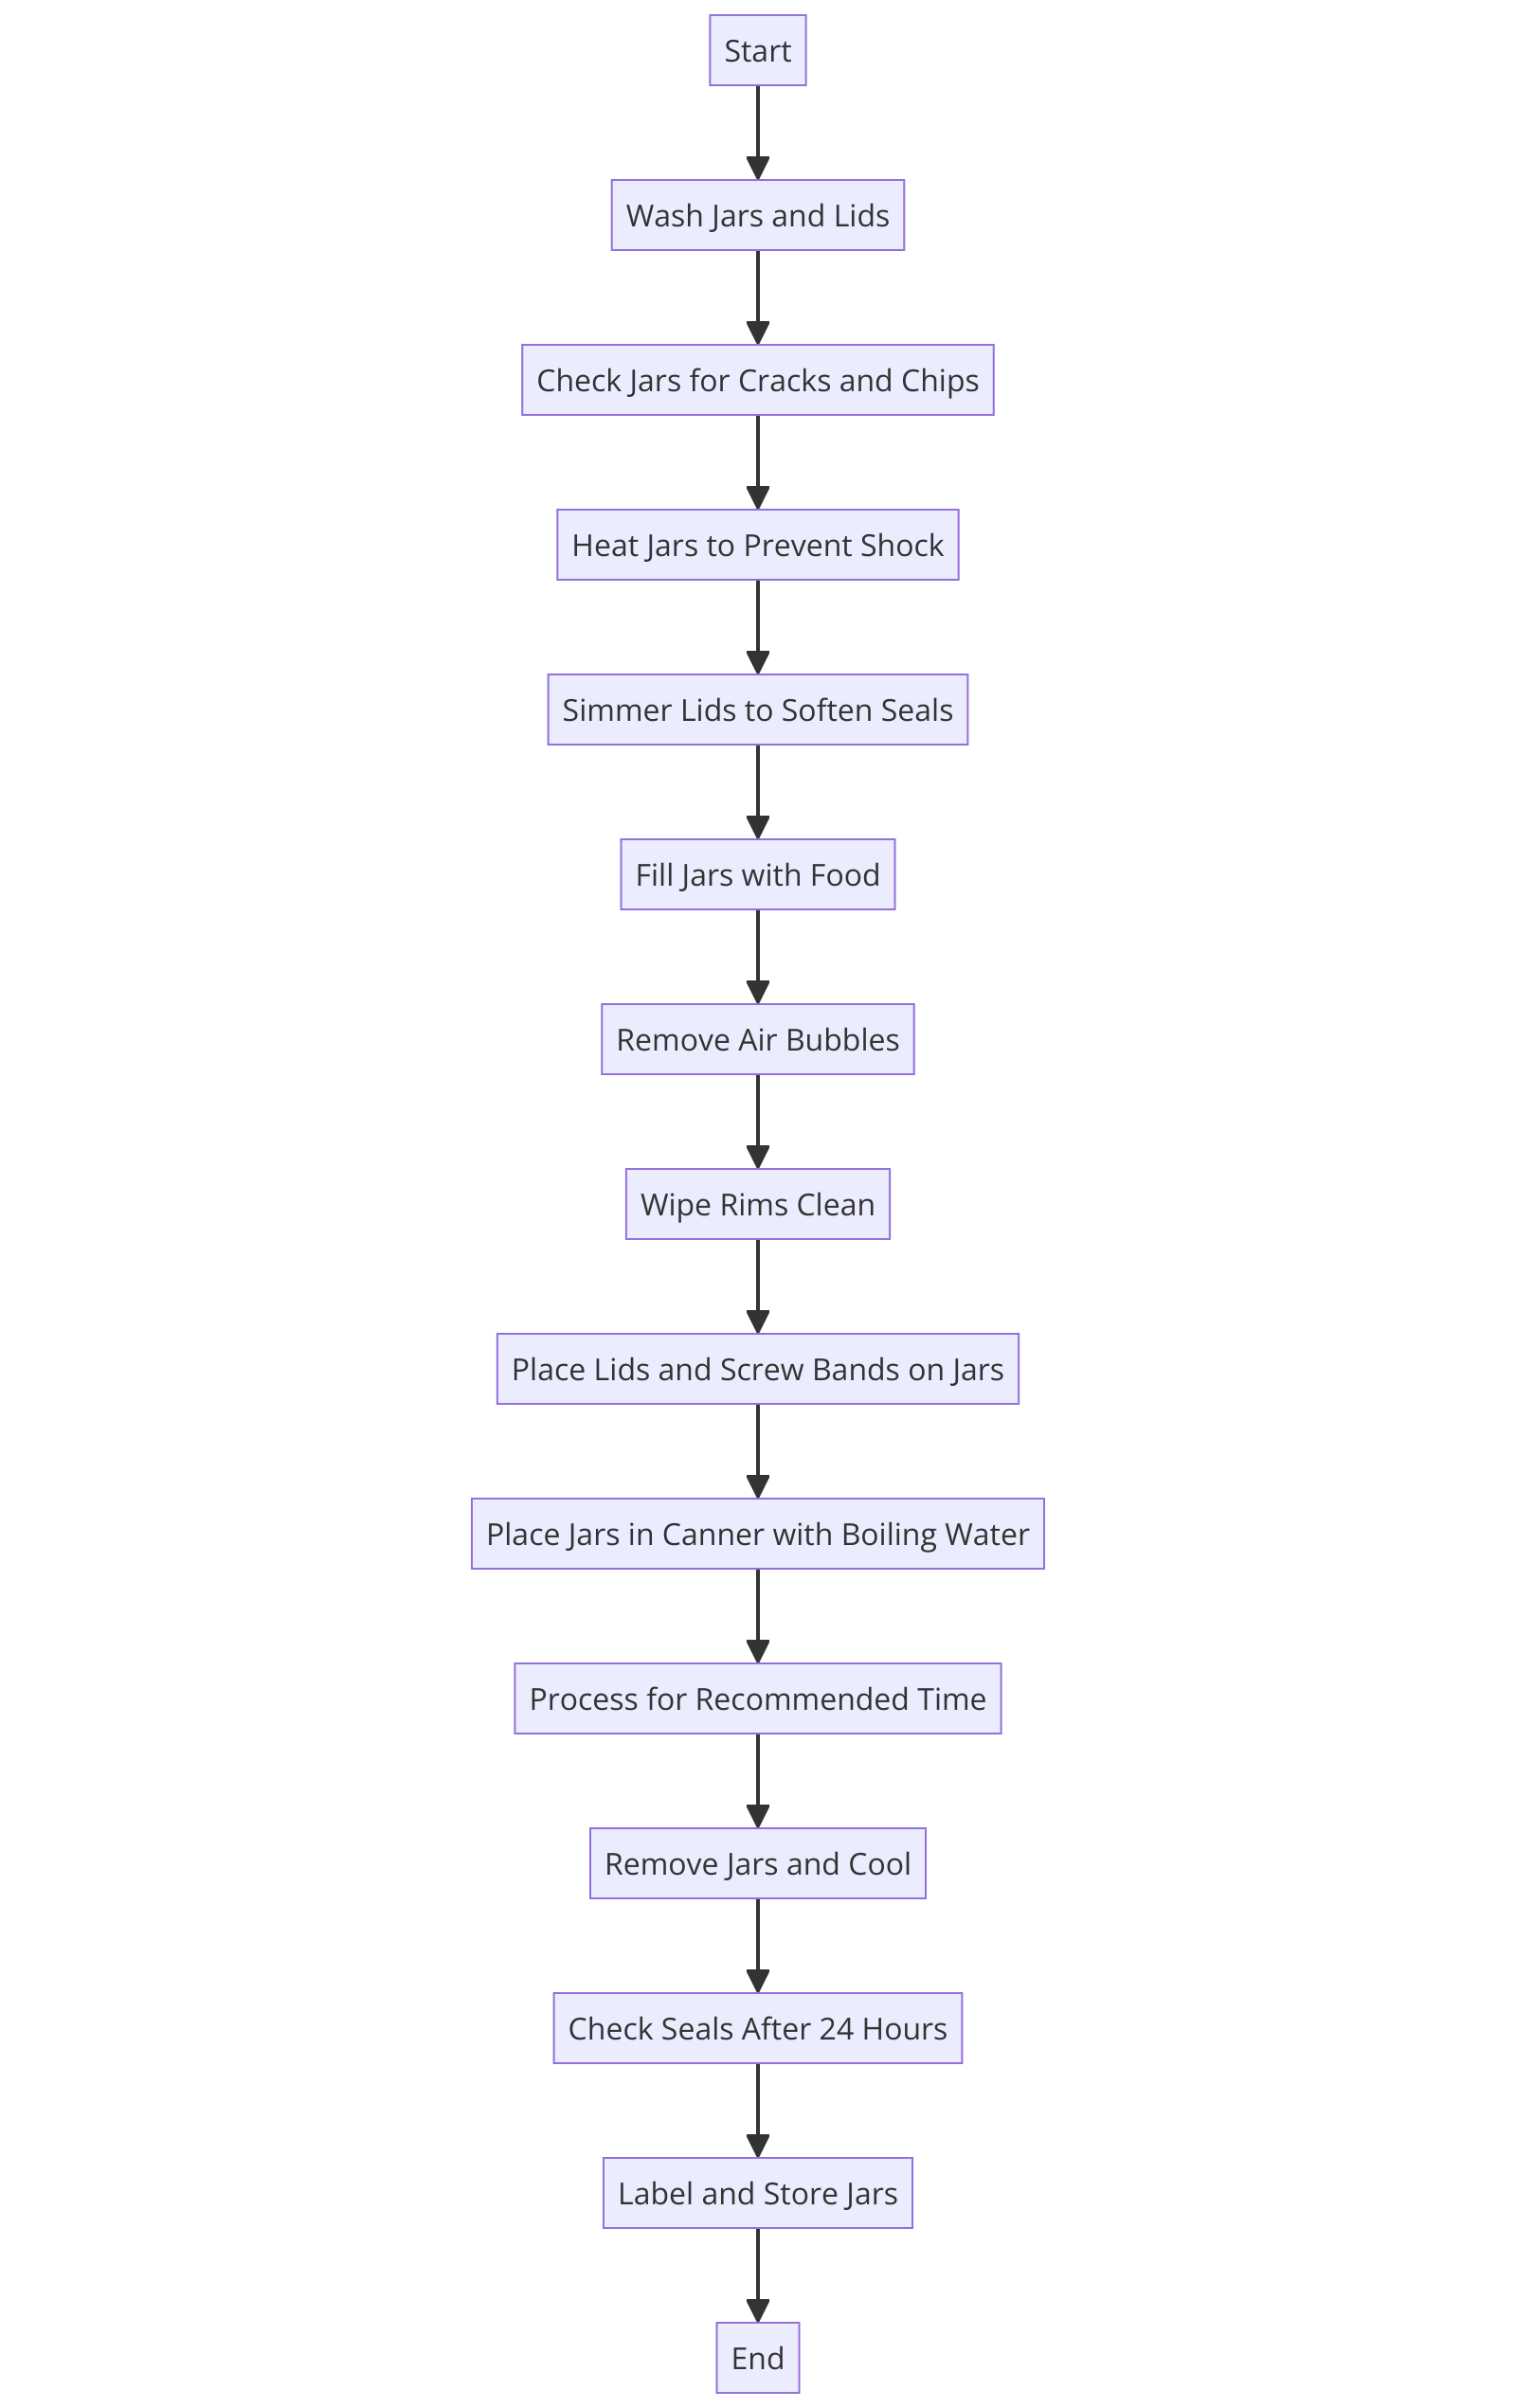
The Canning Process: A Step-by-Step Guide to Safe Canning
Heating and Preparing Your Jars
- Start by placing Ball Mason jars in the oven to sterilize them.
- For water bath canning and pressure canning, always ensure your jars are clean and free of cracks.
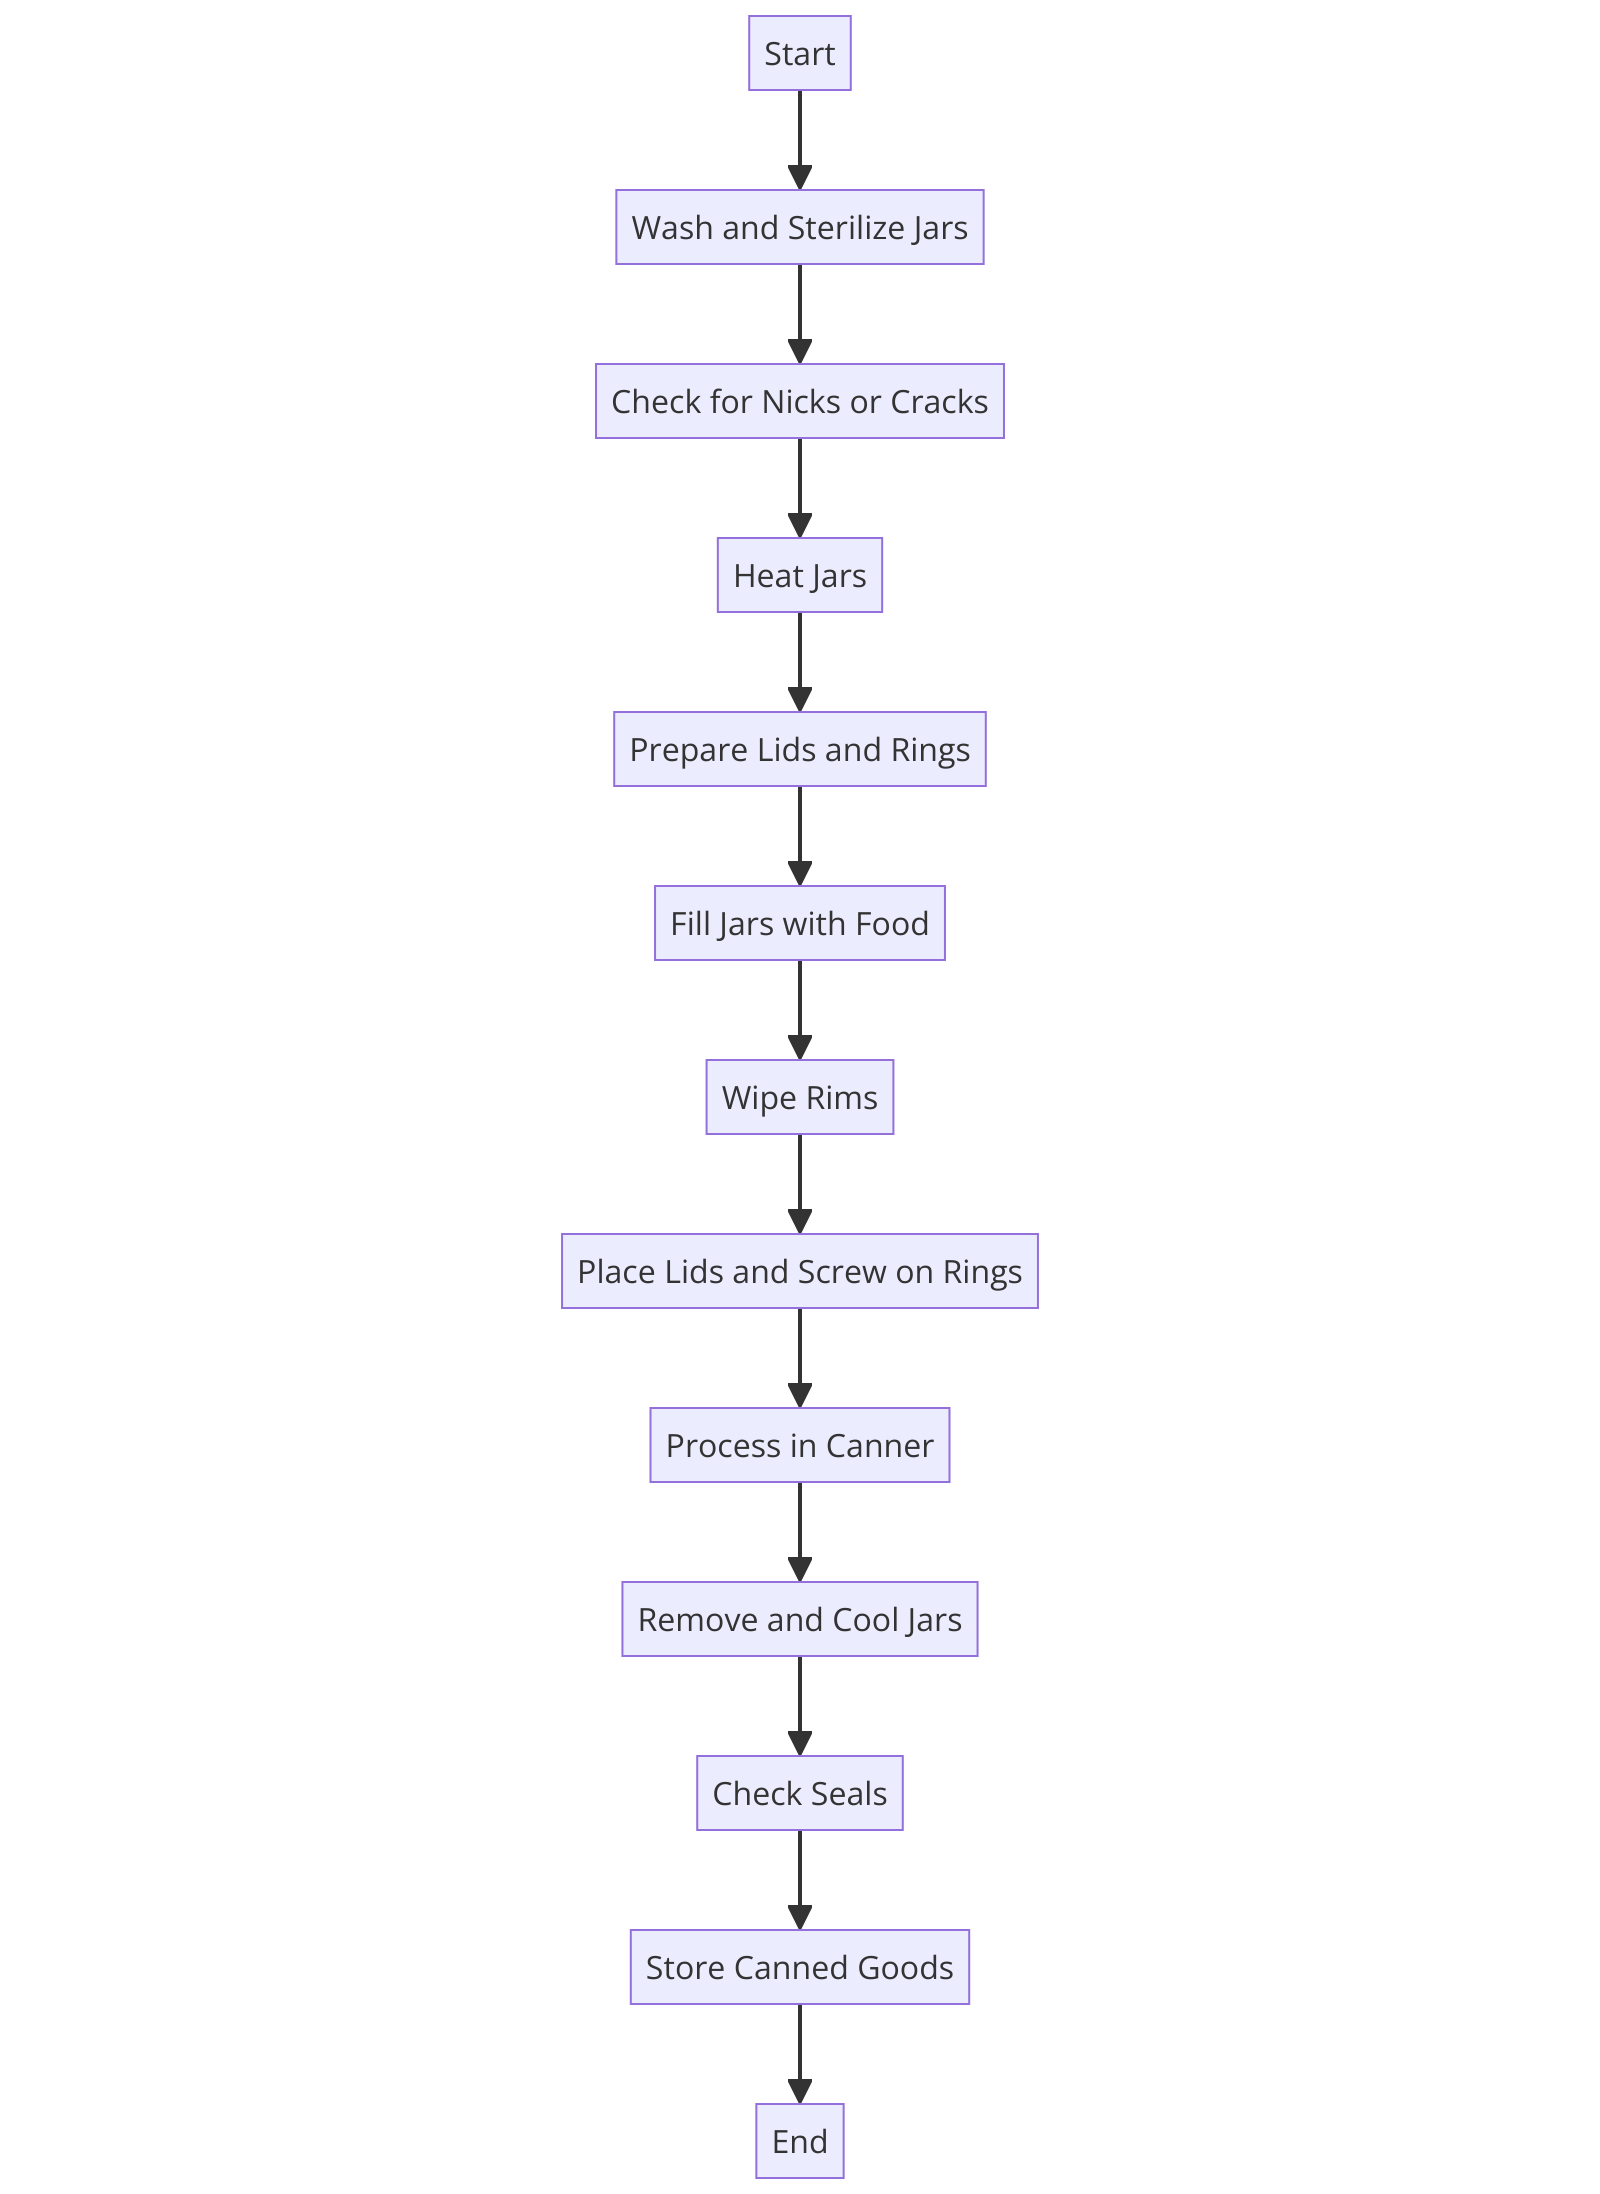
Filling and Sealing Your Jars
- Carefully ladle the prepared food into the jars, leaving the right amount of headspace.
- After sealing the jars, process them in either a water bath canning or pressure canner to create a vacuum seal.
While atmospheric steam canning is gaining popularity for its convenience and efficiency, it’s crucial to be aware of potential risks that may compromise the safety of your home-canned goods.
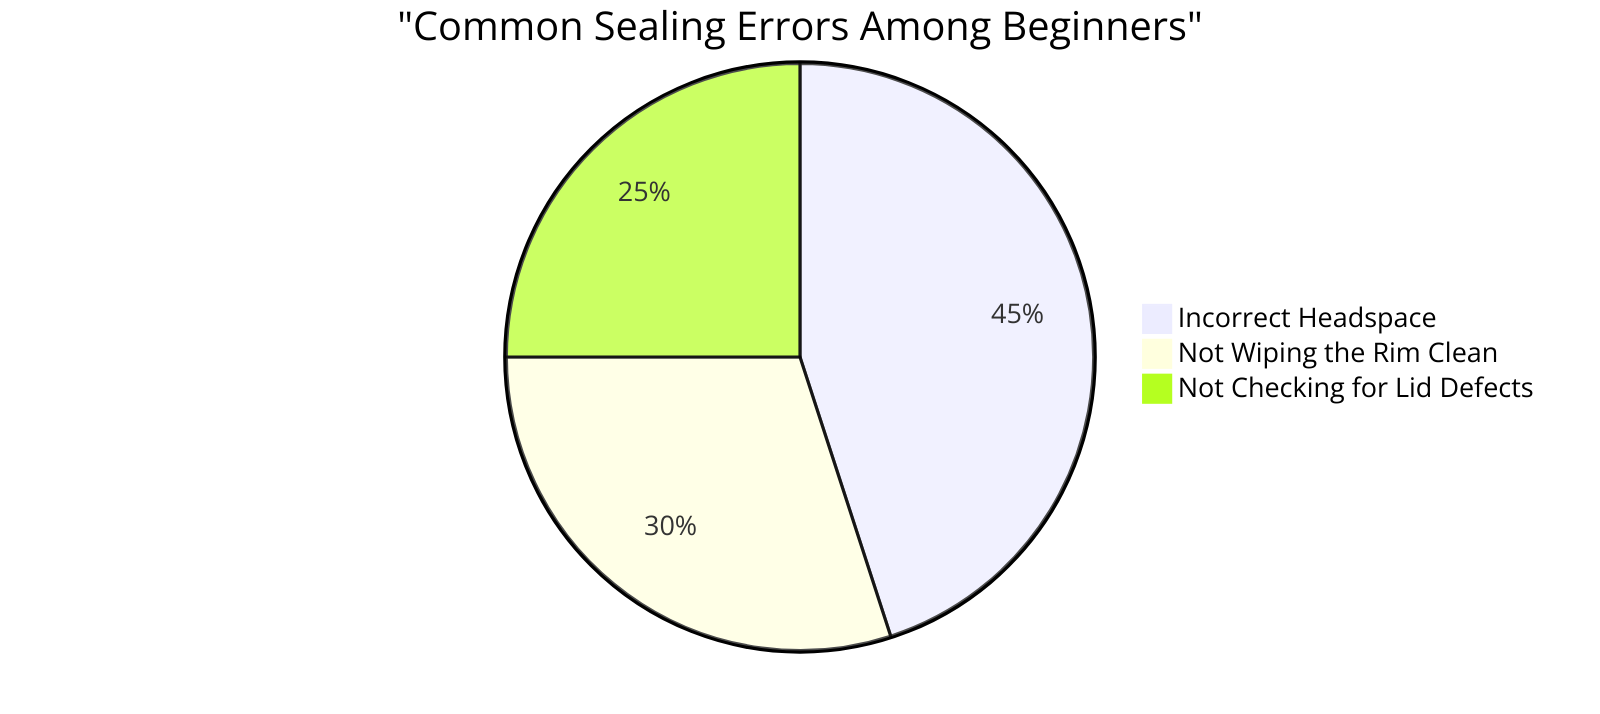
Improper sealing or allowing unheated food to cause the food to spoil can lead to food spoilage or even health hazards.
Always monitor the food inside the jar to ensure it doesn’t float in the jars, indicating potential issues with preservation.
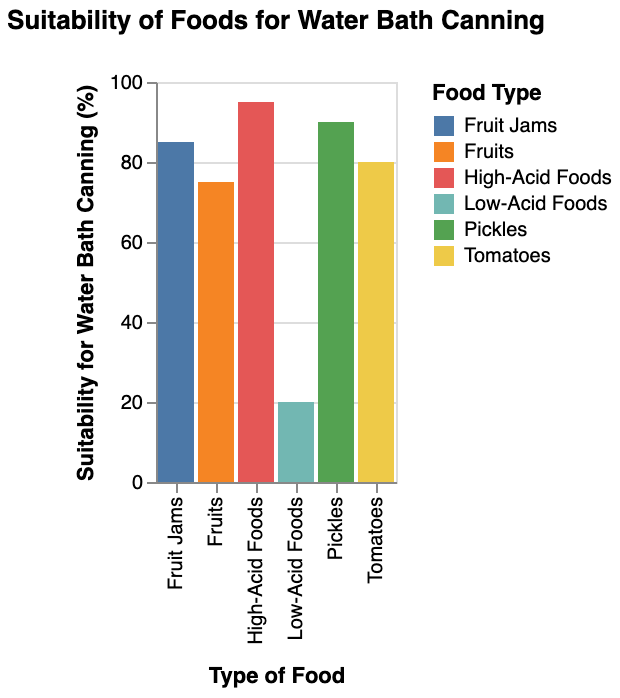
Preserving High-Acid Foods: Mastery of Water Bath Canning
Why Water Bath Canning Is Ideal for High-Acid Foods
When it comes to preserving high-acid foods like canned tomatoes, utilizing water bath canning is ideal.
This canning method offers a safe and efficient way to seal your food in glass jars.
The heating process during canning creates a vacuum seal that locks in the freshness and value of the food.
Using water bath canning allows you to capture the vibrant colors and flavors of your fruits and vegetables without compromising on safety.
Tips for Heating Freshly Prepared Food
When heating freshly prepared food in jars for canning, ensure the canning process that reaches the desired temperature to kill any bacteria that may be present.
Failing to heat the food thoroughly can result in spoilage and potential health risks.
Moreover, insufficient heating around the food may cause discoloration within the jar, affecting both the appearance and taste of your canned goods.
Advanced Techniques: Pressure Canning for Long-Term Preservation
Pressure Canning: A Proven Method for Safe Preservation
When pressure canning, it’s crucial to fill jars loosely with the boiled food.
This method helps keep the food from floating and ensures that the food is canned effectively.
To maintain the acidity of the food, follow this simple list of canning steps:
- Add the freshly prepared food to boiling.
- Allow the jars to sit in the canner for 5 minutes before removing jars.
- By filling the jars loosely with the boiled food, you guarantee that the food is safe and can be stored for the long term.
| Food Item | Method of Preservation | Shelf Life |
|---|---|---|
| Green Beans | Pressure Canning | Up to 1-2 years |
| Water Bath Canning | Up to 1 year | |
| Tomatoes | Pressure Canning | Up to 1-2 years |
| Water Bath Canning | Up to 1 year | |
| Meat | Pressure Canning | Up to 2-5 years |
| Freezing | Up to 6-12 months | |
| Refrigeration | Up to 2-3 days | |
| Soup | Pressure Canning | Up to 1-2 years |
| Freezing | Up to 6 months | |
| Fruits | Pressure Canning | Up to 1-2 years |
| Freezing | Up to 6-12 months | |
| Drying | Up to 6-12 months | |
| Pickles | Pressure Canning | Up to 1-2 years |
| Refrigeration | Up to 1 month | |
| Jam/Jelly | Water Bath Canning | Up to 1 year |
| Refrigeration | Up to 3-4 weeks |
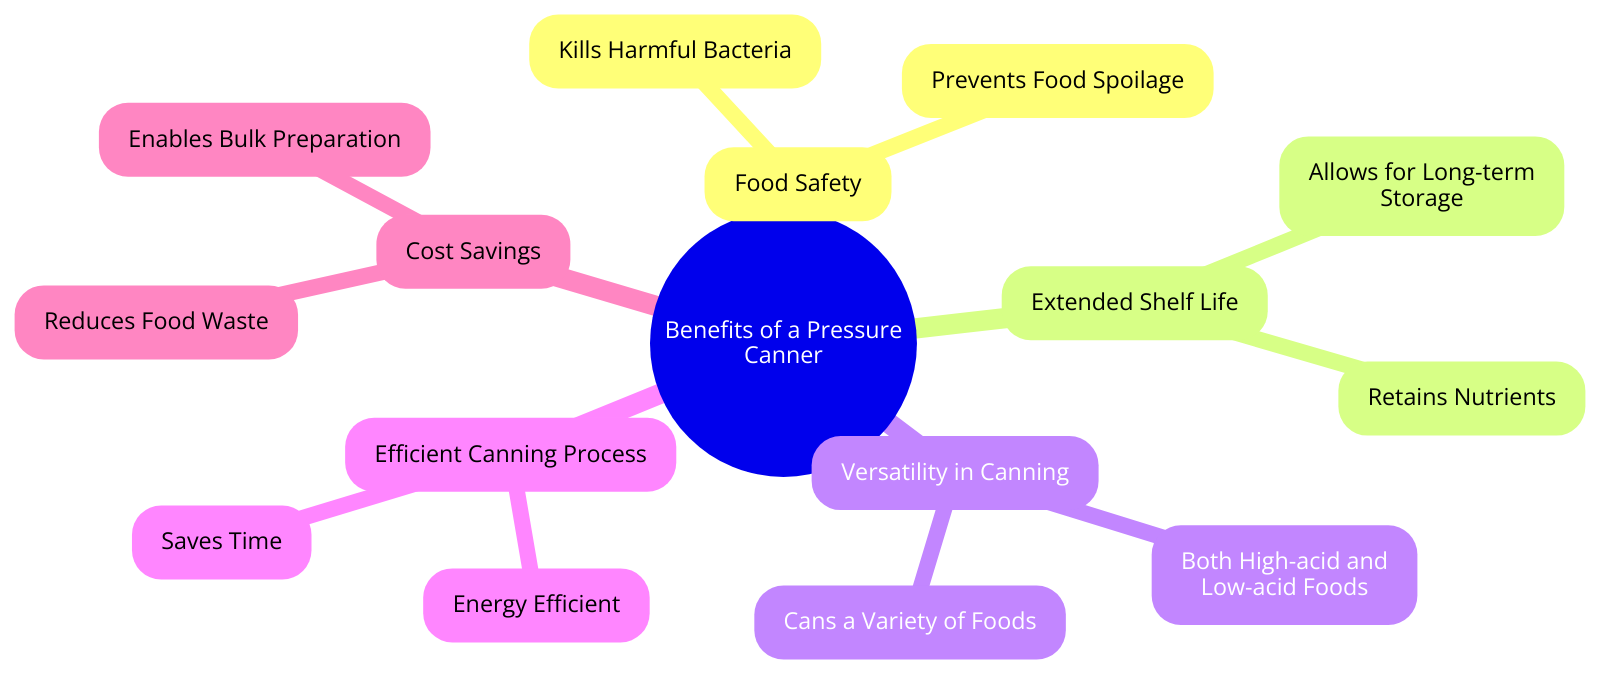
Benefits of Using a Pressure Canner
Utilizing a pressure canner not only helps keep the food preserved but also ensures that the food is safe for consumption.
The combination of pressure and heat in pressure canning creates an environment where harmful bacteria are destroyed.
Remember, proper canning techniques play a vital role in keeping your preserved foods fresh and delicious.
More Resources:
- National Center for Home Food Preservation: Offers a wealth of information, including FAQs, publications, and fact sheets on safe canning practices Nchfp.Uga.Edu.
- The Old Farmer’s Almanac: Provides a beginner-friendly guide to canning food at home, including essential tips and supplies needed Almanac.
- Penn State Extension: Delivers a comprehensive guide on the basics of home canning, outlining best practices and procedures for different canning methods Psu.Edu.
- Ball® Mason Jars Canning Guides: Offers detailed canning guides, tutorials, and videos tailored for both beginners and seasoned canners Ball Mason Jars.
- Healthy Canning: An extensive source for the USDA Complete Guide to Home Canning, alongside numerous canning recipes and safety tips Healthy Canning.